Step-by-Step Guide to ChromeOS Flex Installation: Transform Your Device with Ease
Step-by-Step Guide to ChromeOS Flex Installation:
Introduction
In this comprehensive step-by-step guide to ChromeOS Flex installation, we will delve into the detailed steps required to install ChromeOS Flex, offering you a seamless transformation for your device. ChromeOS Flex brings the power of ChromeOS to a wider range of hardware, expanding its accessibility and versatility.
What is ChromeOS Flex?
ChromeOS Flex is a lightweight operating system based on Google’s ChromeOS, designed to breathe new life into older hardware or non-ChromeOS devices. It offers a streamlined and user-friendly interface, coupled with the robustness and security of ChromeOS.
Preparing for a Step-by-Step Guide to ChromeOS Flex Installation:
Check System Requirements
Ensure your device meets the minimum requirements for ChromeOS Flex installation, including processor compatibility, RAM, and storage space. Check the Certified Model List to start with.
Back Up Your Data
As with any major software installation, it’s crucial to back up your data to prevent loss in case of unforeseen issues during the installation process.
Downloading ChromeOS Flex
The first step is to download the ChromeOS Flex installation image from the Chromebook Recovery Utility extension available in the Chrome webstore.
Creating a Bootable USB Drive
Step 1: Insert your USB drive into your computer.
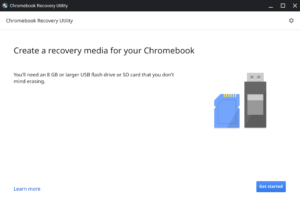
Step 2: Launch the Chromebook Recovery Utility tool from the Chrome browser.
Step 3: Click “Get Started”.
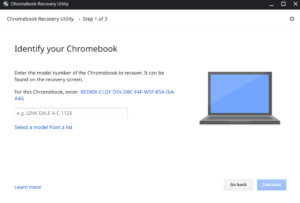
Step 4: Next, select the “Select a model from a list” option.
Step 5: In the “Select a manufacturer” dropdown menu, locate and click on “Google ChromeOS Flex”.
Step 6: Then, in the “Select a product” dropdown menu, find and click on “ChromeOS Flex”.
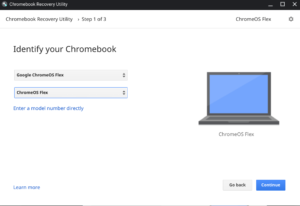
Step 7: After selecting “ChromeOS Flex,” click on the “Continue” button.
Step 8: Select the “USB drive” from the drop-down menu.
Step 9: Finally, click on the “Create Now” button to initiate the creation process.
Installing ChromeOS Flex
Step 1: Boot from the USB Drive
Restart your computer and boot from the USB drive containing the ChromeOS Flex installation image. You may need to adjust your BIOS settings to prioritize booting from USB.
Step 2: Begin Installation
Follow the on-screen prompts to initiate the installation process. You’ll be guided through selecting your language, keyboard layout, and other preferences.
Step 3: Choose Installation Options
Follow these steps:
- On the “Welcome to ChromeOS Flex” screen, click on the “Get started” button.
- On the “Start using ChromeOS Flex” screen, you’ll encounter two options:
- “Try it first”: This option allows you to test and explore ChromeOS Flex without installing it on the device.
- “Install ChromeOS Flex”: Select this option if you wish to permanently install ChromeOS Flex on the device, replacing the existing operating system.
Step 4: Complete Installation
Once you’ve made your selections, sit back and relax as the installation process completes. This may take some time, depending on your hardware specifications. If you are stuck with installing ChromeOS Flex, click here for support.
Post-Installation Setup
Understand the Feature Of ChromeOS Flex
To fully utilize ChromeOS Flex, it’s essential to grasp its key features. These include seamless integration with Google services, lightweight and fast performance, and a secure, sandboxed environment. By leveraging these features, users can maximize productivity and enjoy a streamlined computing experience.
Install Additional Software
ChromeOS Flex comes with a range of pre-installed applications, but you may want to install additional software to enhance your experience. Visit the Chrome Web Store to discover a plethora of apps and extensions.
Conclusion
Congratulations! You’ve successfully installed ChromeOS Flex on your device, By initiating a world of possibilities and breathing new life into older hardware. Hope this step-by-step guide to Chromeos Flex installation is easy and useful. Enjoy the seamless integration, user-friendly interface, and enhanced security that ChromeOS Flex offers, and 100% installation support from Econz, Goolge Cloud Partner.
FAQs
Can I dual-boot ChromeOS Flex with another operating system?
Yes, ChromeOS Flex supports dual-booting with other operating systems, allowing you to choose between ChromeOS Flex and your existing OS at startup.
Will installing ChromeOS Flex void my device warranty?
No, installing ChromeOS Flex does not void your device warranty, as long as you follow the installation instructions carefully and do not modify the hardware.
Can I revert to my previous operating system after installing ChromeOS Flex?
Yes, you can revert to your previous operating system by reinstalling it using the recovery media or installation disk provided by the manufacturer.
Does ChromeOS Flex receive regular updates?
Yes, ChromeOS Flex receives regular updates from Google, ensuring ongoing security patches and feature enhancements.
Is ChromeOS Flex compatible with touchscreen devices?
Yes, ChromeOS Flex is compatible with touchscreen devices, providing an intuitive and interactive user experience.
Get Access Now: ChromeOS Flex Installation support
About Econz
Econz IT Services is a Google Cloud Premier Partner. We work closely with companies in the Biotechnology field to provide right tech. based solutions that help them in tackling their business problems. We not only consult, but also implement these solutions along with providing the right support from time to time.